

I. Background and Significance
Additive manufacturing makes it possible to design and manufacture complex structures, and exhibits great potential applications in aerospace area.
One component can be designed to different configurations, which leads to the difference of stress state and service life.
In order to better understand the relationship between structure and life, as well as provide data reference for the engineering application of additive manufacturing structures, the competition carries out the optimization design, manufacturing and fatigue life assessment of the structure.
II. The Competition Rules
1. General Requirements
Optimal design and manufacture the provided bracket structure, and then test the fatigue life of the new structure. The new structure should has the characteristics of the original structure bearing the vertical tensile loads, achieving weight reduction and high fatigue life.
There are several through holes on the base and vertical plates of the original structure, which are connected with other components through bolts, bearing vertical tensile stress.
2. Materials and Manufacturing Process
1. Material TC4: (Ti6Al4V)
2. Chemical Composition: Chinese national standard GB/T 3620.1-2016
3. Manufacturing process: Selected laser melting, No requirement for equipment types
Chemical composition of TC4 alloy (wt%)
Elements |
Impurity elements, max |
||||||||
Al |
V |
Ti |
Fe |
C |
N |
H |
O |
Other elements |
|
Each |
Total |
||||||||
5.5~6.75 |
3.5~4.5 |
The rest |
0.3 |
0.08 |
0.05 |
0.015 |
0.2 |
0.1 |
0.4 |
3. The Original Bracket Structure
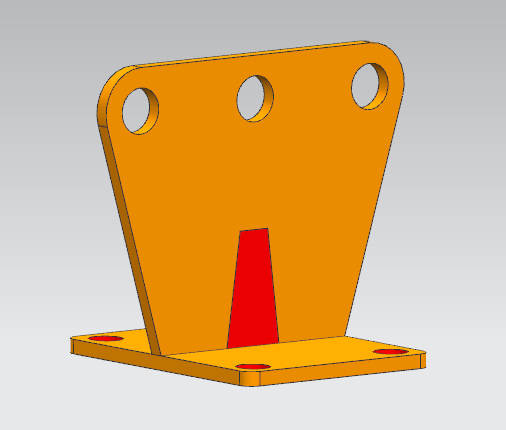
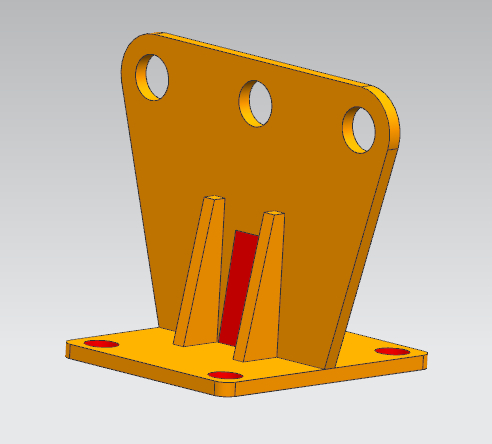
3D drawing of the original bracket structure
4. Optimization Design Regulations
Keep the characteristics of bearing vertical tensile load of the original structure;
Meet the size requirements of the red marked part shown in the right figure;
The parts not marked in red belong to the range of redesign, with unlimited shape and size, and are allowed to expand to the outside of the original structure;
The shape of trapezoidal groove area in the middle of vertical plate is not limited, the size is not less than that of the original trapezoidal groove, and other structures shall not be filled inside.
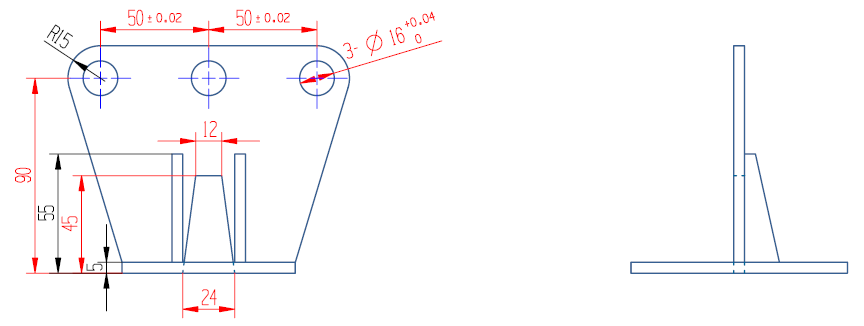
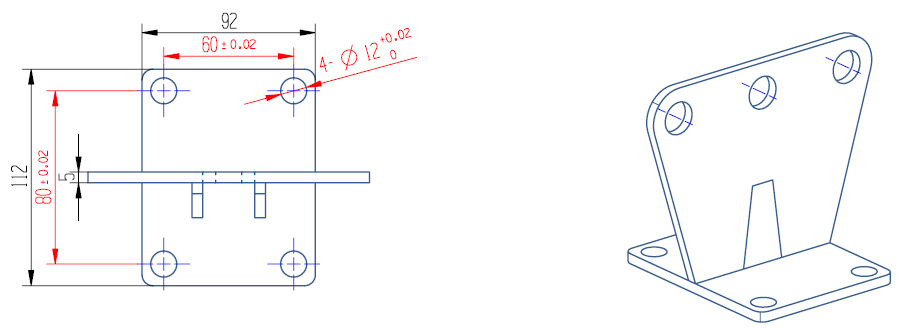
Size of the original bracket structure
The optimized structure shall adapt to the shape and size of the fatigue test fixture shown in the right figure;
During the design of four holes of substructure, the spanner space for fixing bolts shall be reserved to facilitate the clamping of test pieces before the fatigue test.


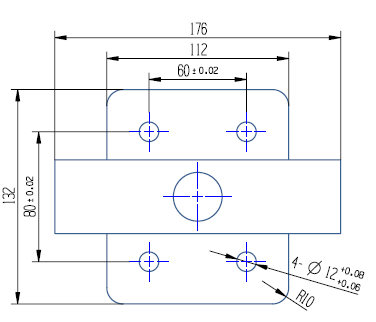
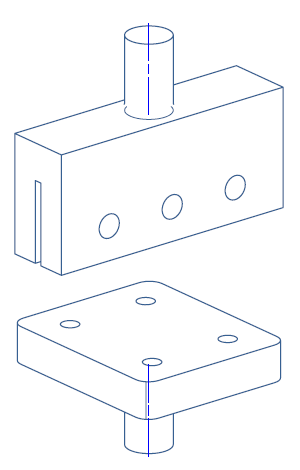
Fatigue test fixture
5. Evaluation Method
1. Chemical composition
All products will be analyzed qualitatively by hand-held composition analyzer, and the results must meet the TC4 composition requirements of the standard. Those who do not meet the requirements will be disqualified.
Take samples from the winning works and use oxygen, nitrogen and hydrogen analyzer to conduct quantitative analysis of O, N and H according to the standard method. If it does not meet the requirements of the material standard, it will be disqualified. The vacancies due to disqualification will be replenished in turn.
2. Product weight (Score coefficient: 0.6)
All products will be weighed by electronic scale (accurate to 0.1g), and sorted from the lightest to the heaviest. Score 100 for the lightest work, compared with it, 1 point will be deducted for every 1% increase in weight of other works, and the score will be accurate to two decimal places.
3. Fatigue test (Score coefficient: 0.4)
Based on the assembly method shown in the right figure, operate the axial fatigue test at room temperature to evaluate the fatigue life of products.
Testing machine: hydraulic servo fatigue machine
Test conditions: room temperature; stress ratio R=0.1
Loading mode: Sine wave; f: ~ 15Hz; Initial load F: 50kN, increase 10kN every 10000 cycles (adjust the load increment and cycles according to the trial test results) until failure; When the testing reaches to 1 × 10⁵ cycles, stop the test even though the part has not ruptured. Record the result: > 1 × 10⁵ cycles.
Failure criterion: Some part of the product breaks, that is, a relatively independent section of the product breaks completely.
Scoring rule: Record the failure cycles. Sort the products lives from the longest to the shortest. Score 100 for the longest life one, compared with it, 1 point will be deducted for every 1% cycles reduction, and the score will be accurate to two decimal places.
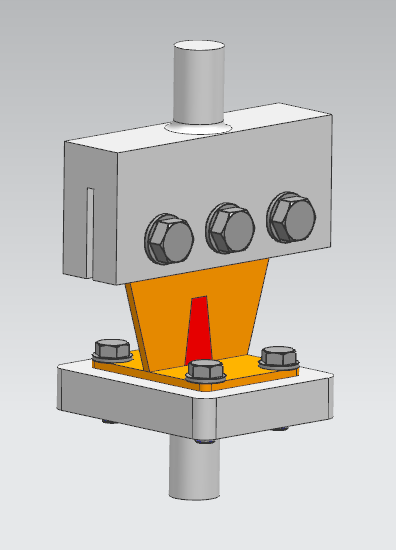
Fatigue test assembly drawing
6. Product Delivery Conditions
1、 Heat treatment
Heat treat the products according to the TC4 alloy standard.
2、 Mechanical processing regulations
1) All supports of the products must be removed;
2) Machine the inner surface of all holes and the bottom surface of the base-plate to meet the red marked dimensions of the figure. The roughness of all machined surfaces must not be less than Ra1.6μm;
3) Mechanical processing of unsupported surfaces in the design area is not allowed. Surface strengthening treatment of the design area is not allowed, but surface sand blowing is allowed.